6 Steps to Accomplishing
Family History: 15 Minutes at a Time
Step 1: Have an attitude that this is possible and do-able, because it is possible and do-able.
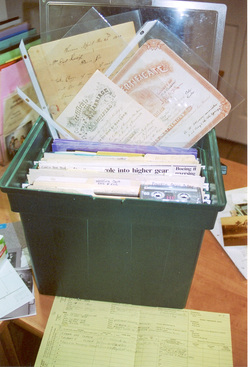
Step 2: Get a box.
Your box may be a physical box to contain your project or a virtual box set up on your computer. You might need both. You may have to do a little organization in order to find room for your box where other family members won’t disturb your project. A box with a lid would be best. Examples of a virtual box are: a Word document where you are working on your life history, an Excel spreadsheet of information or working in a genealogy management program.
Step 3: Put a project in your box.
The majority of class time will be taken discussing possible projects to put in your box and how to break them into smaller bites. Match the project to your interests and abilities, but don’t be afraid to try new things. By focusing in on only one project at a time you will actually accomplish more in the long run. It is not realistic to expect to find very many projects that can be completed in 15 minutes. The key is to keep the project contained so it can be picked up and put down as needed
Step 4: Set up a log.
This log is to record where you end on your project when your available time is gone. By doing this you will be able to pick up right where you left off and spend your entire time available actually working on family history.
Step 5: Find a mentor or coach.
You can go it alone if you have experience in family history. If you don’t have experience, having a mentor will make a big difference. Mentors can help you with what project to work on, answer questions and be your cheerleader.
Step 6: Make a commitment to yourself.
Commit to make time to work on your family history project consistently. Everyone has bits of time that they can carve out if they are willing to look honestly at their activities.
Log:
The log is key to your success. Don’t rely on your memory alone! When you run out of time, immediately write down where to pick up next time. Make your entry detailed enough that you can begin working immediately. Record details such as PID#s when working on FamilySearch.org. Wunderlist or Evernote are excellent places to record a computer log. If you have another note-taking program that you use regularly, then set up a special section for your family history project. If using a computer, I recommend adding your note to the top of the page so that you don’t have to scroll to the bottom of a list every time you want to get started. Keeping your log on paper also works. I recommend using 8 ½ by 11 sheets of paper or a dedicated notebook. This log needs to be kept separate from all of the other notes you write to yourself. Sticky notes have their place in this project, but not as your main log. Unless you are totally stalled, write down questions and follow up items on your log and keep working on your project without getting distracted.
Evernote: http://evernote.com/
Links For Tutorials on Using Evernote: http://granitegenealogytraining.blogspot.com/
Go to bottom right of the page to find the Evernote Section.
Also: http://www.preservingtime.org/going-digital-with-your-genealogy.html
Wunderlist: https://www.wunderlist.com/en/
Living Memory:
There is an emphasis from our leaders to collect living memory before it is lost. They are not referring to just what you personally remember. They are referring to the family photos, stories, and documents that have been left to someone in your family. There is a big emphasis on collecting stories and other memories from each member of a family before they are lost and not handed down and shared. Those with technology skills have been asked to work with less tech savvy family members to record and preserve these memories.
Projects to put in The Box:
Personal Projects:
1. Answer the question: “What do you wish you knew about your great-grandparents?” Make a bookmark with your responses to remind yourself of things to record in your journal for your great-grandchildren to read.
2. Write your own personal history:
4. Edit and restore old family photos.
5. Study the things that you find about your ancestors and think about what they must have felt. Learn to love your ancestors. Know them as real people and not names and dates on a chart.
6. Take pictures of the things in your home that have been handed down in your family. Record the stories behind the items and the individual they came from.
7. Keep your computer and paper files organized as you work.
Family Projects:
1. Gather all of your family’s important documents and preserve them in sheet protectors.
2. Organize your family photos. Identify and preserve them.
3. Record family stories and events as they happen.
4. Get all family photos and documents out of “magnetic” albums and unsafe plastics!
5. Some of these projects will take more time, but preparing for them can be done in your boxed in time.
FamilySearch.org Projects:
Help tutorials and resources: https://familysearch.org/tree-training
Family Tree:
Please, PLEASE, PLEASE index. You may be the one to index the record that breaks down your family’s long standing brick wall.
Temple:
Additional Project Suggestions:
Scanning:
Before beginning a scanning project, learn about archival scanning procedures so that the work will not have to be repeated. We have four scanners at the Mapleton Family History Center. The BYU Family History Library has high speed photo scanners, book scanners and large format scanners. The largest scanner is located in the Map Department of the Library. The best use of your 15 minutes might be to organize your photos or other materials into logical groupings and then make a trip to the family history center or BYU and use the specialized equipment.
Mapleton Family History Center equipment (scroll past classes): https://familysearch.org/learn/wiki/en/Mapleton_Utah_Family_History_Center
BYU Family History Library: http://guides.lib.byu.edu/content.php?pid=46986&sid=372141
Transcription:
There are many ways to share your work beyond uploading to FamilySearch. Remember to share with your immediate family and not just your extended family. Consider these suggestions:
o https://familysearch.org/learn/wiki/en/Main_Page
o http://www.preservingtime.org/tutorials--classes.html
o https://www.rootstech.org/?lang=eng
Good Luck!
Family History: 15 Minutes at a Time
Step 1: Have an attitude that this is possible and do-able, because it is possible and do-able.
Step 2: Get a box.
Your box may be a physical box to contain your project or a virtual box set up on your computer. You might need both. You may have to do a little organization in order to find room for your box where other family members won’t disturb your project. A box with a lid would be best. Examples of a virtual box are: a Word document where you are working on your life history, an Excel spreadsheet of information or working in a genealogy management program.
Step 3: Put a project in your box.
The majority of class time will be taken discussing possible projects to put in your box and how to break them into smaller bites. Match the project to your interests and abilities, but don’t be afraid to try new things. By focusing in on only one project at a time you will actually accomplish more in the long run. It is not realistic to expect to find very many projects that can be completed in 15 minutes. The key is to keep the project contained so it can be picked up and put down as needed
Step 4: Set up a log.
This log is to record where you end on your project when your available time is gone. By doing this you will be able to pick up right where you left off and spend your entire time available actually working on family history.
Step 5: Find a mentor or coach.
You can go it alone if you have experience in family history. If you don’t have experience, having a mentor will make a big difference. Mentors can help you with what project to work on, answer questions and be your cheerleader.
Step 6: Make a commitment to yourself.
Commit to make time to work on your family history project consistently. Everyone has bits of time that they can carve out if they are willing to look honestly at their activities.
Log:
The log is key to your success. Don’t rely on your memory alone! When you run out of time, immediately write down where to pick up next time. Make your entry detailed enough that you can begin working immediately. Record details such as PID#s when working on FamilySearch.org. Wunderlist or Evernote are excellent places to record a computer log. If you have another note-taking program that you use regularly, then set up a special section for your family history project. If using a computer, I recommend adding your note to the top of the page so that you don’t have to scroll to the bottom of a list every time you want to get started. Keeping your log on paper also works. I recommend using 8 ½ by 11 sheets of paper or a dedicated notebook. This log needs to be kept separate from all of the other notes you write to yourself. Sticky notes have their place in this project, but not as your main log. Unless you are totally stalled, write down questions and follow up items on your log and keep working on your project without getting distracted.
Evernote: http://evernote.com/
Links For Tutorials on Using Evernote: http://granitegenealogytraining.blogspot.com/
Go to bottom right of the page to find the Evernote Section.
Also: http://www.preservingtime.org/going-digital-with-your-genealogy.html
Wunderlist: https://www.wunderlist.com/en/
Living Memory:
There is an emphasis from our leaders to collect living memory before it is lost. They are not referring to just what you personally remember. They are referring to the family photos, stories, and documents that have been left to someone in your family. There is a big emphasis on collecting stories and other memories from each member of a family before they are lost and not handed down and shared. Those with technology skills have been asked to work with less tech savvy family members to record and preserve these memories.
Projects to put in The Box:
- Remember FOCUS on one thing at a time.
- Pray and ask for the Holy Ghost to help you select a project and for help to make the best use of your time.
- These projects are focused on things that can be done in the home or at a personal computer. There are many different opportunities available at the family history center or library. There are also many important opportunities waiting for you in the homes of your family members. If you can’t get to them in their homes, make contact with them and try to help them “long-distance”.
Personal Projects:
1. Answer the question: “What do you wish you knew about your great-grandparents?” Make a bookmark with your responses to remind yourself of things to record in your journal for your great-grandchildren to read.
2. Write your own personal history:
- Create a timeline of the major events in your life. You may want to include historical events and how they affected you.
- Organize a notebook or computer file to record the most meaningful memories from your life such as life lessons learned and things that strengthened your testimony. What stories from your life would help strengthen someone else? Add to this record as the memories come to you. Record the stories of the events that have made you who you are. Names, dates, places and facts are important, but the stories, whys and feelings are more important…and more interesting.
- Answer the question: What are the top 100 (50/25/1000) things that have happened to you in your life?
4. Edit and restore old family photos.
5. Study the things that you find about your ancestors and think about what they must have felt. Learn to love your ancestors. Know them as real people and not names and dates on a chart.
6. Take pictures of the things in your home that have been handed down in your family. Record the stories behind the items and the individual they came from.
7. Keep your computer and paper files organized as you work.
Family Projects:
1. Gather all of your family’s important documents and preserve them in sheet protectors.
2. Organize your family photos. Identify and preserve them.
3. Record family stories and events as they happen.
4. Get all family photos and documents out of “magnetic” albums and unsafe plastics!
5. Some of these projects will take more time, but preparing for them can be done in your boxed in time.
- Have a family home evening looking at the photos you have gathered and record the stories about the photos. Transcribe these stories.
- Write stories of your ancestors in a way that they can be used as bedtime stories for young family members.
- Go to Google Earth and look up the addresses that you have found as you have gathered and sourced records. If any family homes or landmarks are local, take your family to the location and photograph them.
FamilySearch.org Projects:
Help tutorials and resources: https://familysearch.org/tree-training
Family Tree:
- Go to Family Tree and make sure you are connected to your family.
- Systematically go through family tree looking for missing information, especially in the first few generations. (Information about Living Individuals does not display right now, but they are working on changing this so that families can see this information.)
- Enter information you or other family members have that is not in Family Tree yet.
- In a systematic way, attach census records for all censuses available during the lifetime of an individual. View the records to determine if they show other family members missing in Family Tree.
- Use Search Records to attach sources to individuals in the tree. Work one family at a time. Printing a Family Group record will help you track your work. (Preview before printing!) Keep a log of things that you or another family member could research in the future.
- Check www.findagrave.com for entries about your family members. Attach these as sources in Family Tree. Tree Connect will help you do this without having to do manual entry. (See www.recordseek.com .)
- Upload digital files of photos you have (or can beg, borrow or “steal”). Be familiar with FamilySearch policies concerning photos of living individuals.
- Tag individuals in the photos you upload and connect them to Family Tree.
- Tag unidentified individuals you know in photos uploaded by other people.
- Upload stories to FamilySearch Memories and connect them to the appropriate individual(s).
- Upload documents to FamilySearch Memories, tag them and connect them to the appropriate individual(s).
- Share links of Memories included on FamilySearch with other family members. Hopefully you can get them interested and they will share the photos and information they have.
- By selecting one individual, it is possible to even do research projects in small increments of time. The key is keeping good notes and entries in your log.
- If you are not familiar with decendancy research, go to FamilySearch Learn (https://familysearch.org/learningcenter/home.html ) and learn how to do this type of research.
- Go to www.Puzzilla.org and examine it for leads of where to focus your decendancy research. (https://familysearch.org/learningcenter/lesson/finding-our-cousins-introduction-to-puzzilla-org/883 )
- Do decendancy research. Remember keep your focus; keep good notes and entries in your log.
Please, PLEASE, PLEASE index. You may be the one to index the record that breaks down your family’s long standing brick wall.
Temple:
- As you work, watch carefully for individuals with missing temple ordinances. I have a great-great grandfather that the temple icon says his work is complete and it isn’t. Please don’t go Green Arrow Chasing only. Individuals and work that needs to be done will be missed. If an individual is missing from a family the icon may indicate the work is complete when it actually isn’t. (The temple icon appears on the traditional pedigree view in family tree above the couples “box” when you hover over their names with your mouse.)
- Before taking a name to the temple, study the information in Family Tree about that individual. From the sources and memories information, try to get a feel for what life was like for them and their family. Get to know your family member as a person and not a name and a date.
Additional Project Suggestions:
Scanning:
Before beginning a scanning project, learn about archival scanning procedures so that the work will not have to be repeated. We have four scanners at the Mapleton Family History Center. The BYU Family History Library has high speed photo scanners, book scanners and large format scanners. The largest scanner is located in the Map Department of the Library. The best use of your 15 minutes might be to organize your photos or other materials into logical groupings and then make a trip to the family history center or BYU and use the specialized equipment.
Mapleton Family History Center equipment (scroll past classes): https://familysearch.org/learn/wiki/en/Mapleton_Utah_Family_History_Center
BYU Family History Library: http://guides.lib.byu.edu/content.php?pid=46986&sid=372141
- Scan your own personal photos and documents.
- Scan photos, documents and life histories obtained from other family members.
- Share the files you scan on FamilySearch and with other family members.
Transcription:
- Transcribe handwritten histories and stories from your life or the lives of other family members.
- Convert old cassette tape interviews to a digital format. Transcribe the recordings.
- Transcribe letters.
There are many ways to share your work beyond uploading to FamilySearch. Remember to share with your immediate family and not just your extended family. Consider these suggestions:
- Host a family website
- Start a family blog
- Share the digital files you have of family photos and stories.
- Be creative! Start an “Ancestor of the Month” email or Facebook club. Create family games using information or photos of your ancestor. Start a family newsletter.
- Prepare for interviewing family members when you know that you will be visiting them soon. http://www.preservingtime.org/interviews.html has information about successful interviewing. FamilySearch wiki and learn also have information. Who, What, When and Where are not as important as Why, Feelings and Stories. Be prepared with a digital voice recorder or video recorder to record the interview.
- It is possible to interview “long-distance”. Ask an individual about their life via telephone, email or snail mail. Prepare for “long-distance” interviews using the information above. Apps are available to record phone conversations.
- Contact the “family genealogist” and find out what records and information they have. See what they are willing to share with you.
- Interview the “family genealogist”. They probably have many good stories to tell, but have not focused on themselves because of their other work.
- Interview yourself or your immediate family members. Someone doesn’t have to be “old” to be worth interviewing.
- Send someone a link to photos uploaded to FamilySearch. Have a phone interview about the stories behind the photos while you are both looking at the same page.
- Use Skype or other similar programs to interview more distant relatives. Remember: record any interviews whenever possible.
- Ask your mentor or the “family genealogist” for suggestions for other projects that would fit your time constraints and interests.
- Ask your “family genealogist” for special assignments such as creating a spreadsheet of names included in a diary or searching online newspapers for information.
- Learn about the history and times of the area where your ancestors lived. This will gives you clues to your research as well as help you to get to know your ancestors.
- “Google your Ancestors” Learn to use search limiters so that information can be found on lesser known sites. Google only searches a small part of what is available (I’ve read 25%). Search for ancestors on Yippy.com and other search engines. Links for other search engines can be found at: http://www.preservingtime.org/search-engines.html
- Learn from online classes available at FamilySearch.org and other online locations.
o https://familysearch.org/learn/wiki/en/Main_Page
o http://www.preservingtime.org/tutorials--classes.html
o https://www.rootstech.org/?lang=eng
- Digitize, DIGITIZE, DIGITIZE any information, records or photos that you are able to access…and make sure you always back up your computer files. To learn more about backing up go to: www.bestbackups.com/blog/7153/everything-you-need-to-know-about-personal-data-archiving/
- Other helpful websites are: lifehacker.com/ and http://www.makeuseof.com/
Good Luck!